Man, has this series been neglected! I was going to tell you folks how I synchronized the power states of my Pi, marquee light, and monitor with an Arduino, but it turns out it’s hard to write Arduino tutorials when you’re only barely certain of what you’re doing, electronics‐wise, and at the back of your mind the whole time is a creeping suspicion that your instructions are going to get someone electrocuted.
While I work through these insecurities, let’s turn our attention elsewhere in order to get this series unstuck.
The Hardware
I’ve mentioned the Pac‐Drive briefly before. Each of my arcade buttons has an LED inside, and all of them are hooked up to the Pac‐Drive so I can coordinate which buttons get illuminated in certain situations. So far in this series I haven’t done anything with the Pac‐Drive, so all buttons are lit up all the time.
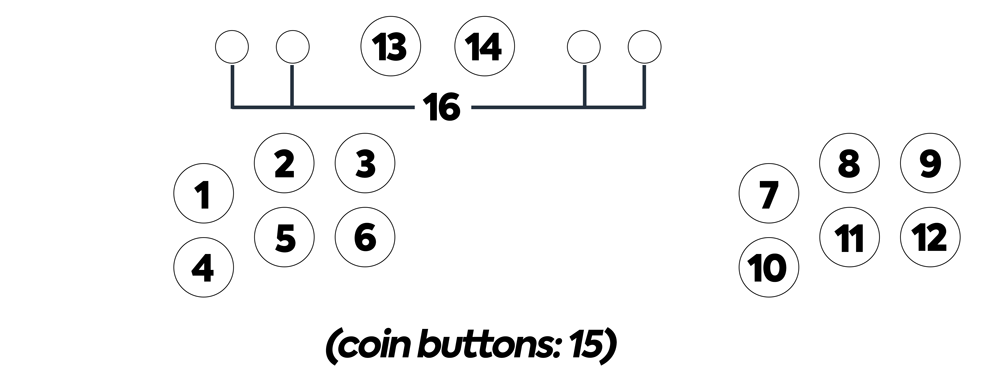
It’s got 16 terminals for LEDs. I have more than 16 buttons on my control panel, but not all of them would need to be controlled granularly. So here’s how I hooked them up when I was wiring my control panel:
- Terminals 1–6 control Player 1’s buttons.
- Terminals 7–12 control Player 2’s buttons.
- Terminals 13 and 14 control the two Start buttons, respectively.
- Terminal 15 can control both coin buttons on the front.
- Terminal 16 can control all four of the smaller function buttons.
We discussed the wiring back in part two. Amazingly, that’s the easy part. Sure, it’s a bit tedious to run individual wires to each button, but it’s not exactly intellectually demanding.
The challenge
As I’ve mentioned before, most of the MAME ecosystem is Windows‐based, with Linux only an afterthought. There’s an interesting tool called LEDBlinky whose purpose is to light up only the active buttons for the game you’re playing. It integrates deeply into both MAME and the most popular frontends so that it knows which game you’re launching, knows how you’ve configured the controls in MAME, and lights up only the buttons that are used to play that particular game. And it’s only available on Windows!
I decided I wanted something similar out of my cabinet, with the caveat that I didn’t want to do anything, uh, hard or time‐consuming. Luckily, in addition to being lazy, I also set low standards for myself: all I needed was a solution that could work for the roughly 100 games I’ve put into this cabinet, not any arbitrary MAME game.
Software
Ultimarc makes great hardware, but if I had it to do over again I might’ve chosen an LED controller with an official Linux utility. Their SDK has libraries for C#, C++, VB.NET, and Delphi — none of which are useful to me.
Luckily, the Pac‐Drive is a simple HID device, much like a keyboard or a mouse. After some digging, I found this third‐party utility for Linux that allows controlling a Pac‐Drive from the command line.
It was exactly what I needed, but it’s about ten years old and took a bit of wrangling to get installed on a Pi. But I suffer so that you don’t have to.
Installing the software
First, you’ll need at least these packages:
sudo apt-get install libusb-dev build-essentialYou’ll also need libhid, but it’s deprecated and therefore hard to find. There’s no package for it in APT. Even seeing the source code involved registering on some random SourceForge‐like site. And once you’ve got it you have to make a change to the source code before it’ll even compile on the Pi.
Rather than have you recapitulate this painful process, I’m hosting the fixed source code myself.
From your home directory, do:
mkdir src && cd src
wget "https://andrewdupont.net/pi/libhid-0.2.16.tar.gz"
tar xvzf libhid-0.2.16.tar.gz
cd libhid-0.2.16
./configure
make
sudo make install
If all went as planned, you should now be able to build the pacdrive binary.
cd ~/src
wget "http://www.zumbrovalley.net/pacdrive/dnld/pacdrive_0_2.tar.gz"
tar xvzf pacdrive_0_2.tar.gz
cd pacdrive_0_2
make
At this point you can do make install to put the binary in /usr/bin. I’m trying to keep customizations inside my home folder as much as possible, so instead I manually copied the pacdrive binary to /home/pi/bin. Put it wherever you like, as long as it’s in your PATH.
Does it work?
You can run pacdrive --help to brush up on the syntax. Assuming all your LEDs are on, run pacdrive -f; if everything is working properly, all your LEDs should go off. Running pacdrive -a should turn them all back on.
You can pick out individual LEDs to turn on or off, like so:
# turn everything off, then turn on LEDs 1 and 12
pacdrive -f -l1 1 -l12 1
Or you can encode each button’s on‐off state into a 16‐bit bitmask:
# set every LED on except LED #1
pacdrive -s 0xfffeHooking into RetroPie
Being able to control the LEDs from the command line is a major step forward. But two problems still need solving:
How will it know which LEDs to light up for which game?
I don’t have the patience or the systems programming expertise to figure out how to ask MAME which buttons are mapped for a particular game. And even if I could figure that out, I’d have a solution which worked only for MAME and not for Daphne (the Dragon’s Lair/Space Ace emulator) nor any future emulators I may choose to install.
Instead I’m just going to create a simple config file for each game. This will allow me to specify which controls should be active when that game is running. It’s more bookkeeping, but it’ll work exactly the same way across emulators.
Here’s what I came up with:
- Create a
/home/pi/ledsdirectory. - Inside that directory, create another directory for each system you want to emulate. I’ve got
arcadeanddaphne; you may have others. - Inside each system’s directory, define a text file whose name matches the name of the game. For instance, the two‐player version of The Simpsons is named
simpsons2p, so I’d create/home/pi/leds/arcade/simpsons2p.cfgwith the following contents:1, 2, 7, 8. In other words: light up buttons 1, 2, 7, and 8, and turn off all other buttons.
How will we light up the LEDs on game launch?
In RetroPie, all emulator launches go through a script called runcommand.sh. This wrapper script is responsible for a number of lifecycle tasks — displaying the pre‐launch menu, applying a CPU governor if one is configured for that game, switching video modes, and so on.
RetroPie 4.0 added the ability to hook into this lifecycle with scripts named runcommand-onstart.sh and runcommand-onend.sh. These scripts receive a few arguments, among them the system and ROM name — which is all the information we need to look up a game’s LED config and apply it.
This is a big deal. We don’t need to integrate with MAME. The fact that RetroPie launches every game the exact same way regardless of platform means that we can ignore the emulator entirely. Adding LED metadata for a game is a 30‐second process that works exactly the same way for all games that RetroPie can run.
I’ve used Python for scripting in previous installments, but I don’t need the GPIO library for this task, so I’ll use Ruby instead. It’s not installed by default on Raspbian Jessie, but sudo apt-get install ruby2.1 will take care of that. (2.1 was the latest stable version in APT when I first did this; grab a newer version if it’s available.)
Last time I threw a few long code blocks into the post. This time I’m putting the scripts into a Gist. Open it in another tab and follow along.
led-start and led-end are the Ruby scripts; place them in /home/pi/bin. Before reading the config for a game, led-start will read a global config at /home/pi/.ledrc (if it exists). My .ledrc looks like this:
+13, +14, +15, +16The leading + means “force to be on”; this allows the start buttons, coin buttons, and function buttons to default to on without my having to include them in every single game’s config file. This is a bit overengineered, but it saved me a lot of time when composing the configs by hand.
led-end is much simpler; all we need to do is turn all LEDs back on.
These utilities get used by runcommand-onstart.sh and runcommand-onend.sh, respectively. Those scripts should go in /opt/retropie/configs/all. If you’re a seasoned RetroPie veteran, these files might already exist with contents of your invention; if so just combine the two files. You’re smart enough to work that out.
The proof
If nothing explodes, here’s roughly what should happen:
What’s the point of all this?
I’m not sure. I had fun doing it, though.
What I like about the RetroPie experience isn’t just the cheap hardware; it’s that the barrier for experimentation is much lower. Unix is a pneumatic system where all the tubes are transparent — you can reason about it on a high level even when you don’t understand the particulars.
Thus you don’t have to follow a tutorial to the exact letter. Often you can just grab your favorite parts from three different tutorials and duct‐tape them together like I did. It’s exciting. This project is a long train of what‐if thoughts that I saw through to completion. If you like this idea, feel free to steal it in its entirety. But also feel free to break it into parts and use those parts to build your own train.
Next time
Retain everything you learned about the runcommand.sh lifecycle — you’ll need that knowledge for the next installment, when we automatically switch the joystick between 4‐way and 8‐way mode according to what the game requires.
Comments
Dude!! you are awesome. Documenting all of this and taking the time to detail the way you did is fantastic. I have taken some parts and I’m duct taping together my own. Thank you very much!!!
if you get the following error when running pacdrive commands: “pacdrive: error while loading shared libraries: libhid.so.0: cannot open shared object file: No such file or directory”.
Run the command
sudo ldconfigand this should fix the error.Hi, thank you for your very hard work, and I would like to comment about some problems I have encountered when tried to use your manual.
First I would like to thank “dgw” for solving libhid problem with command:
sudo ldconfigwhich solve library issue. After that I could use a pacdrive utility, but unfortunately scripts wasn’t working at the time. After little digging I have maked “led-end”, “led-start” and “pacdrive” files sitting in “/home/pi/bin” an executable with “chmod +x”, also after reading “dev/shm/runcommand.log file appered that “home/pi/.ledrc is a must file and coudn’t be ignored. Almost forget to mention, if your game files has a space or bracket script doesn’t work, for example file “Mega Man 3 (U) (!).nes” and setting file “Mega Man 3 (U) (!).cfg” will not work, but after changing name to “MegaMan3.nes”, and “MegaMan3.cfg” will work.Again thank you for your tutorial.
Neat tutorial, thought it might work for the Ultimarc Ultimate I/O (like an iPac and PacDrive rolled into one) but it just complains that it can’t find a PacDrive.
Also came across this on github which seems to have copied this tutorial word-for-word but doesn’t include the helpful hints in the comments like resolving the library issue… https://gist.github.com/savetheclocktower/c7644597c9c4c3990b7fee363d5f03c1
Virusinc: I don’t have any experience with the Ultimate I/O. It wouldn’t surprise me if the
pacdriveutility doesn’t account for it at all. I don’t know if it was around when that utility was written.I really wish Ultimarc would have a blessed first-party SDK for Linux; right now they point customers to this page. I did all the work documented on this page before Katie’s “3 Nov 2016” software update, so it’s possible that her software now handles LED control with the PacDrive. That might be your best bet.
And, yeah, that Gist is mine. I wrote up a couple of the items in this series as one-off Gists long before I worked up the resolve to begin an eleven-part series. I regret that some people find this series and others find the Gists; if I get the time I’ll try to update these articles with some of the useful tips that people have posted in the Gist comments.
Glad that my post about Raspbian Stretch was helpful to someone, and thanks for calling me a kind soul. :*)
Hi, Thanks for the awesome guide.
However i’m having a small problem. I want to connect 4 Pacdrives and it’s only detecting 1… All the ID’s are set, it works fine with Windows software, but i’m not able control them individually on the rpi. Any thoughts?
Thanks!
Stijn, I haven’t needed to use more than one Pacdrive, so I won’t be of much help. Are they showing up as distinct devices in
/dev? Are you opting into control of a specific board via the-b(or--board) argument of thepacdrivebinary? If so, I’m out of ideas.Andrew, thanks for the reply.
They are showing up as 2 devices, but with the same IdVendor and same IdProduct (which makes sense, even though they have different ID’s). When trying to control a different board with -b, it just says only 1 board is connected. Using Katie’s Ultimarc Linux code I’m running into the same problem no matter if I use a Raspberry or Ubuntu. Since I’m very limited in time, I ordered a PacLED64 to use instead of 4 Pacdrives.
Thanks again for the tutorial though, very well written and interesting
This project is awesome!! Been using it on my Pi 3 B+ with a pacdrive for a long time now. However, I received the Pi 4 for x-mas and the libhid commands are giving me trouble. Basically I keep getting a ‘Werror Truncation Error’ when I run the ‘make’ command over ssh. Is there a possibility that you might know what is happening here? I can provide log files if you would like. Thank you very much!
P.S. Your tool is amazing. I’m suprised this is the only program I can find for a pacdrive on RPi :)
Thanks!
Sadly, I don’t have any insight on compile errors that happen on the Pi 4. I’ve got one sitting in a box, but I was waiting until RetroPie was confirmed to work for the 4, and I might not get around to it even then.
I would’ve preferred to write something inspired by pacdrive, rather than having to resort to tricks to get it to compile. But I couldn’t figure out how to apply the same concepts with HIDAPI (the successor to libhid). I’m hoping someone with more experience in this area can come along and make all our lives easier.
Haha, yeah. Thanks for the reply at least!
Ok so I finally figured it out! Since I already had a built binary and a compiled libhid on my RPi 3, I just transferred it over to the RPi 4 with the necessary scripts and directories. Ruby 2.1 didn’t work for me, so I got it from the Debian Repository with ‘sudo apt-get install ruby’. Now it functions as expected! As for the compile errors, I have no clue. The RPi 3 compiled libhid perfectly fine. Thanks again for making this great tool!
comparable for me,
I got it to work with one pac drive only. But conneting two at the same (with differnt ID’s) seamed not to work on my pi.
Did any body get it to work or has hints for debugging ?
I found it myself: pac_prog.h:
define MAX_PACS 1
with the comment “I can’T imagine it would ever be more than this” and currently only one is supportet :-)
Exactly what scripts and directories did you transfer over? I do have a build on rpi3 that works fine, but rpi4 I got the same ‘Werror Truncation Error’ when running the make command.
I’ve been redoing this for the Pi 4 since the official Retropie build came out. I hope I can properly convey what I did with text… I also must mention I had a Pi 3 originally.
So first I followed this guide entirely on my Pi 3. If Pi 4 was not in the picture, this works amazing. For some weird reason, libhid does not want to compile on the Pi 4 because of some truncation error, like you said. TL;DR I copied and pasted all the files from the compiled libhid on my 3 to my 4 using the same directory paths.
So the first thing you need to do is follow this guide on the Pi 4 until libhid fails ‘make’ with a truncation error. Set the 4 aside for now and get these files from your Pi 3 in a place you will remember them. I used FileZilla and SSH for this:
/usr/lib/arm-linux-gnueabihf/libhid.so (Might be in /usr/local/lib/)
/usr/lib/arm-linux-gnueabihf/libhid.so.0 (Might also be in /usr/local/lib/)
/home/pi/bin/led-start
/home/pi/bin/led-end
/home/pi/bin/pacdrive (This is the pacdrive binary, and it may be in a different path)
/home/pi/leds (if you want to keep your previous per-game settings)
Once you have all of that, you need to put them all in the same path on your Pi 4. The libhid.so and libhid.so.0 should go into
‘/usr/lib/arm-linux-gnueabihf/’. If you were able to transfer all of the files (some might need the root user to transfer) then essentially you should have a working copy of libhid on your Pi 4. You don’t need to compile the pacdrive binary if you transferred it over from your Pi 3. Make sure you install ruby using ‘sudo apt-get install ruby’! At this point, everything should be working. Reboot your Pi. Go to the directory with the pacdrive binary (should be ‘/home/pi/bin’!) and do ‘pacdrive -f’. If everything worked right, Your lights should turn off. If it doesn’t work, try with sudo. There are notes in the blog about fixing USB permission errors if you cannot run it without sudo. Once you are able to control the lights from the command line, you are good to go! Just finish up the rest of the guide detailing the run-command and the .ledrc config. I really hope my word dump helped you out! There isn’t much else I can say because I don’t know why libhid doesn’t compile, and I don’t know why libhid works after being manually transferred. I hope it works for you!
Thank you for posting what scripts needed to be moved. The ones I didn’t know I had to move were the
/usr/lib/arm-linux-gnueabihf/libhid.so
/usr/lib/arm-linux-gnueabihf/libhid.so.0
I transfered them by using winSCP, from the pi3, to the /home/pi directory and then used:
“`sudo mv /home/pi/libhid.so /usr/lib/arm-linux-gnueabihf/
sudo mv /home/pi/libhid.so.0 /usr/lib/arm-linux-gnueabihf/
Hey Andrew,
thank you for all the work, i follow your guide and i got one error in your LED-Start script. Ruby is not availible in 2.1 for RPI3 so i had to install ruby 2.3 and they take some changes so the script take an exit in line
21: $options[:debug_path] = path unless (path.nil? || path.empty?)
When i ask google, it tells me that they changes the nil command, is it possible for you to fix the script?
The LED-End script is working fine.
regards
Jens