Here’s my dilemma: I want to give enough detail to make this series worth reading, but not so much detail that it gets mistaken for a step‐by‐step tutorial. After all, I’m largely following other people’s plans here, and if I wanted to do a tutorial I should’ve taken twice as many photos.
In particular, the stage we’ve come to — installing and configuring RetroPie — has extensive documentation already. Any tutorial I write would be a pale imitation of what already exists.
So rather than hold your hand through the process, I’ll use this post to talk about some of the things I wish I’d known when I was installing RetroPie for the first time. The RetroPie docs should be your first destination; lots of supplemental information can be found in the RetroPie‐Setup wiki on GitHub.
Installing
I’d suggest that you follow the installation guide to the letter. The simplest way to start with RetroPie is to download one of the pre‐built images and burn it onto an SD card. Technically you’re able to install RetroPie on top of an existing Raspbian system, but in an age where SD cards are like candy and it takes only a couple minutes to write a disk image to a card, why bother?
Here’s what you’ll be doing with your first few boots:
Hooking up a keyboard
Soon you’ll be able to work primarily over SSH. But at first you’ll need to use a physical keyboard hooked up to the Pi. If you have as many headless Pis around the house as I do, you might want to invest in a wireless keyboard and trackpad. This one from Logitech has worked great for me.
Enabling SSH
On newer releases of Raspbian, SSH access is disabled by default for security reasons. You can enable it via raspi-config — but first, by God, change the default password.
Configuring controls
One of RetroPie’s wrinkles (for our purposes) is that it assumes you’ll be using a console‐style gamepad. It wants you to configure it upon first launch of EmulationStation. My recommendation:
- Map up/down/left/right to the directions on Player One’s joystick.
- Map A and B to Player One’s buttons 1 and 2.
- Map Select and Start to Player One’s coin button and start button.
Buttons 3–6 can be mapped to X, Y, L, and R in whatever order seems sensible to you. This process is also used to determine your initial control mapping for RetroArch emulators, but you’ll almost certainly be tweaking that later anyway, so don’t agonize over your choices.
Adding ROMs
Once SSH is enabled, you can use an SFTP client like Transmit to transfer your ROMs — or just scp them from the command line. If you’re transferring them from a Windows machine, consider enabling the Samba share in RetroPie so that you can drag‐and‐drop from Windows Explorer.
ROMs live under /home/pi/RetroPie/roms and are organized into sub‐folders by system. Pac‐Man, for instance, should be found at /home/pi/RetroPie/roms/arcade/pacman.zip. If the arcade folder doesn’t exist, create it.
It used to be that every different sort of arcade emulator was treated as a different system; now they’re all grouped into one system and you can choose which emulator to use for a particular game at launch time. This makes life much easier.
Cleaning up the menus
You’ll want to get rid of the systems you won’t be using. Systems don’t show up in the menu if their ROM folders are empty, but some stuff comes pre‐installed, so a few systems will show up in the menus on every installation: Amiga, ZX Spectrum, Dreamcast, and a few others.
Believe it or not, the best way to stop these from showing up is to go into the base ROMs folder, create a directory called unused, and move any system folders into that directory. You don’t have to delete their contents.
Input
The good news about RetroArch is that the controls you specify once will apply to about half a dozen different emulators.
The bad news about RetroArch is that if those controls are surprising or otherwise not what you expected, you’ll be ass‐deep in six different menus trying to find the exact setting to change.
Need to remap?
Let’s say you launch a game and find that the button layout is not what you want it to be. Here’s what to do:
Stick to the RetroArch GUI…
Try to do everything you possibly can through the RetroArch GUI. Editing config files by hand is treacherous because you’re never entirely sure if the one you’re editing is the right one for a particular game/emulator/system, and because RetroArch has a staggering number of options.
You can reach the RetroArch config menu by holding Select and pressing X — which, at least on my mapping, means holding Player 1’s coin button and pressing button 3.
…if it exists
If you can’t get the RetroArch menu to come up, you probably aren’t in a libretro emulator. Only the emulators with an lr- prefix in their name can be configured through the GUI. Non-libretro emulators each have their own way of setting controls. (This is one reason why one of your small control panel buttons should be mapped to Tab — it brings up the config menu in non-libretro versions of MAME.)
Configure global controls
The RetroPie wiki page I linked to above talks about “core input remapping.” This is something worth trying, but only once you’ve decided that your global button mapping is the way you want it. If your buttons seem out‐of‐order across many different games and emulators, you want to first change how your controls bind to RetroArch by going to Settings → Input → Input User 1 Binds. Your goal is to choose a good default configuration to minimize the number of overrides you apply.
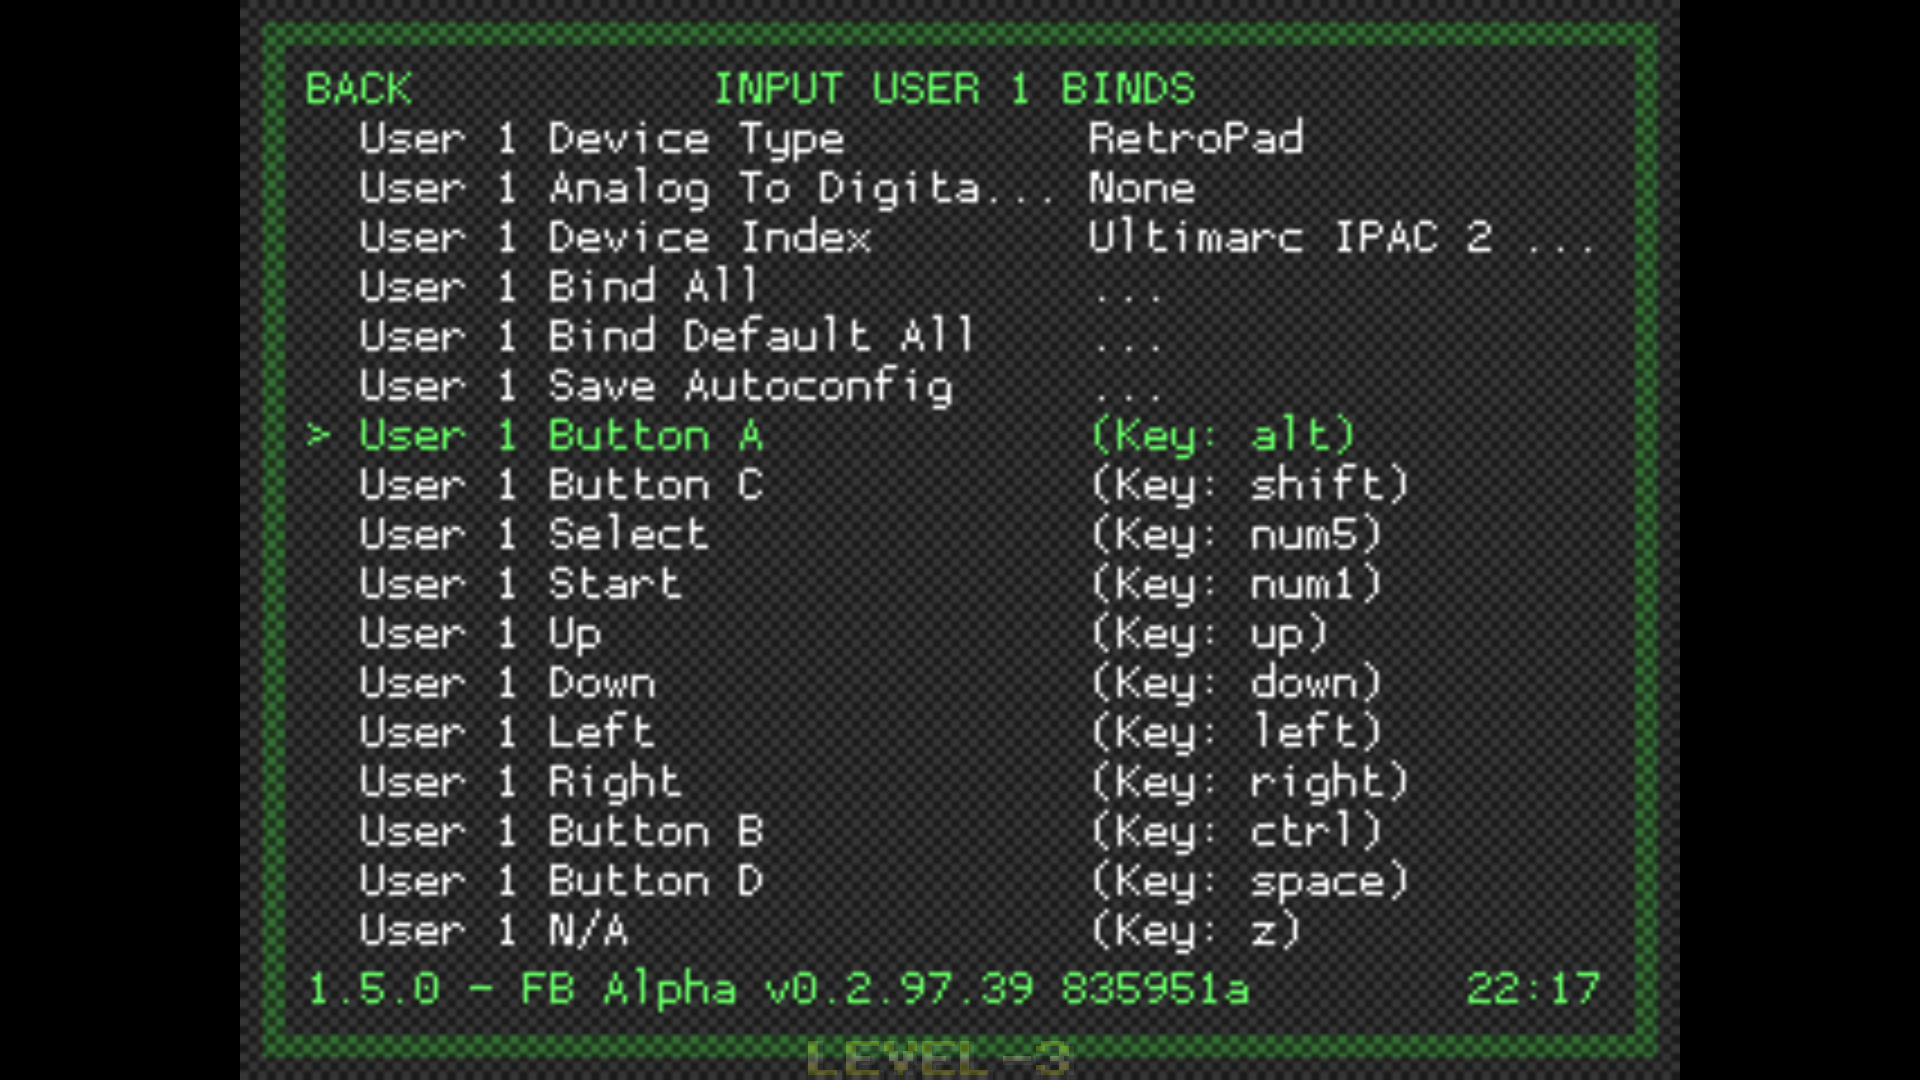
(This, by the way, is also where you can map controls for Player 2.)
Configure local overrides
Once you’re certain that your global controls are the way you want them, you can start applying overrides where necessary using the “core input remapping” technique described in the wiki. For instance, you can say that Button 1 should map to the X button (we’re stuck with gamepad‐style labels here, sadly), then apply that override to your current core (e.g., all games that use lr-fbalpha) or your current game (e.g., only The Simpsons on lr-fbalpha).
When I found that some emulators were swapping buttons 2 and 3, the mistake I made was to do this step before I was aware of the global input configuration menu. Then, once I realized my mistake and changed my global configuration, I had to go back into those overrides to undo the core‐ and game‐specific swaps I’d already made.
Theming
EmulationStation is themeable. The default theme these days is named Carbon. If it appeals to you, godspeed. It was not my cup of tea, and none of the other common ES themes were what I had in mind either. So I decided to hack on Carbon until it did what I want.
The default Carbon theme is located in /etc/emulationstation/themes/carbon. I copied the carbon folder, renamed it, and dove in. It’s XML, so I wouldn’t blame you if you didn’t want to mess with it, but just a few tweaks can make a world of difference:

- First, make sure your Pi is configured to output at the proper resolution and aspect ratio. Mine was slightly off — 16:9 instead of 16:10, I think — and it made all the text look stretched out and ugly. I didn’t pick up on this for a while.
-
Open
carbon.xmlin the root directory and note its references to fonts. They’re not awful, but you can do much better even using something free like Google Fonts. Pick out a good display font and something that looks good at small sizes, then download theTTFfiles. For body text I used Archivo Narrow. For the display font I used Telephoto, which has long been one of my favorite fonts. (Telephoto is not free; if you want something free that looks similar try News Cycle or Francois One.)Or, y’know, do your own thing. Just make sure to use TTFs. Telephoto was an OTF, so I had to use FontForge to convert it.
Carbon puts a lot of things in all‐caps. I changed most of these to display in mixed case.
-
Go minimalist. There’s a background on nearly every screen, and it struck me as loud, so any time I saw a reference to
carbon_fiber.pngin the XML I took it out and swapped in a blank black PNG. -
There are dozens of folders, one for each system. It’d be tedious to change all these theme files, but since we’re doing only one system on our cabinet (for now), you can focus on just
./carbon.xmland./arcade/theme.xml. -
I probably could’ve stopped here and been happy with it. I did make a bunch of tweaks to the layout of the game list: removing unnecessary labels from self‐explanatory fields (year, genre, etc.) and moving elements around just a bit. But those fields will only show up in the first place if your games have metadata, and we’ll get to that in a future article.
Read up on the theme documentation if you want to install a completely different theme — or if you want to go deeper and build a theme from scratch.
About ROMs and Emulators
Emulators
The reason RetroPie comes with a half‐dozen different arcade emulators is that they’re good at different things. For instance:
- The
libretroversion of FinalBurn Alpha (lr-fbalpha) gives the best performance, in my experience, but it is pretty choosy about what it supports: really old stuff plus games from Capcom, Konami, SNK, and a few other manufacturers. - MAME 2003 (
lr-mame2003) has great performance but, as the name implies, only knows how to emulate games that MAME supported in 2003. The other two mainline MAME versions (lr-mame2010andlr-mame2014) have similar tradeoffs. - AdvanceMAME (
advmame) often comes through for me when a game somehow won’t run well in anything else, but it’s not alibretroemulator, so you have to configure it separately from the rest.
When you launch a game, you’ll see the Runcommand Launch Menu for about two seconds. During that window, you can press a button to go into pre‐launch configuration. This is where you can choose a non‐default emulator or output resolution.
ROM set versions
ROMs are weird. The advice I’m about to give you assumes you’re not a completionist and that you want to run a maximum of a couple hundred games on the cabinet, rather than the entire MAME library. If this doesn’t apply to you, jump ahead.
Let’s say you want to play Cyberball in MAME 2010. That emulator will want the version of cyberbal.zip from the 0.139 ROM set. You’ll track it down, put it in the roms/arcade folder, and launch the game.
If it works: great! If it almost works — maybe the sound is garbled or the framerate makes it unplayable — you might try MAME 2003 next. You will not need to move cyberbal.zip — all the arcade emulators look for their roms in the same spot. But MAME 2003 will want the version of cyberbal.zip from the 0.78 ROM set.
Now, if you’re lucky, those two versions of cyberbal.zip will be identical. Often a ROM doesn’t change at all from one set version to another. But sometimes it changes quite a bit. If you pick an emulator for a game, launch it, and then get thrown back into EmulationStation’s game list without explanation, it’s often because that emulator expects a different version of that game’s ROM. (Errors get logged to /dev/shm/runcommand.log, but in my experience some emulators are more diligent about logging these failures than others.)
It’s fortunate, then, that the Internet Archive hosts many different versions of the MAME ROM set in non‐merged form (which, you’ll soon learn, is what you want). Our ancestors used to have to wink and nudge and say things about “acquiring files” from “elsewhere” (i.e., USENET). But now there’s no need. The Internet Archive hosts these files legally under a DMCA exemption, and you’re probably an adult who can decide for yourself whether you are legally entitled to download certain ROMs — and, if not, whether you care.
This list of RetroPie’s MAME emulators will tell you exactly which ROM set version you need for a given emulator. I swear this is less tedious than it used to be.
Clones
Some ROMs are “clones” of other ROMs — i.e., variants that share the vast majority of their logic with another ROM. Think different revisions of an arcade release. 95% of the time you’ll want to use the base ROM.
But check this list for the exceptions — the cases where a clone may arguably be the better version of a game. Most notably, some famous four‐player games (The Simpsons, Teenage Mutant Ninja Turtles, Gauntlet) have a clone for two‐player arcade cabinets, and that’s obviously the version you’ll want to run on your two‐player arcade cabinet.
Merged vs. Split vs. Non‐Merged ROMs
I won’t try to explain this past MAME’s own documentation. I’ll just say that in my situation — using about 100 ROMs and not needing more than one version of any specific game — non‐merged ROMs were the way to go.
The documentation doesn’t recommend non‐merged ROMs because of duplicated dependencies for similar ROMs. But I don’t care about that; I care about my ROMs being self‐contained. With split sets, the two‐player version of The Simpsons depends on the four‐player base ROM. That means I’d have to keep both of them in my ROMs folder and have both of them show up in my games list, even though I’m only ever going to play the two‐player version. Madness. The only advantage of split or merged ROMs is disk space savings, but disk space is the least of my worries when I’m emulating 100 games.
Next Time
Do you see what I mean? I said I’d just give you the bullet points, but look how long this article got.
We’ve got to get to the rest of this series: projects that, to my surprise, don’t already have good step‐by‐step guides. I’ll be writing about
- controlling a Raspberry Pi’s volume with a dedicated hardware knob;
- using a PacDrive from the command line on Raspbian;
- hooking into RetroPie’s game‐launching lifecycle to light up only the buttons you’ll be using for a particular game;
- safe startup and shutdown of your Pi with a single button press;
- using an Arduino to make your marquee and monitor turn on when your Pi starts up, and turn off when your Pi shuts down; and
- curating your ROMs’ metadata with some simple scripts.